HPE 2204
Curriculum Models in Physical Education
Games for understanding – A tactical games approach
Tutorial 7 (First tutorial for Volleyball)
Warm up
Organisation of Divided Court Game 1
Conduct rules:
Procedural rules:
Tactical solution :
With the ball
Without the ball
Volleyball is a sport which requires quick reactions and rapid, controlled movements over relatively short distances. It can be described as a ‘readiness-state’ sport. This state of readiness is required both physically and mentally.
This readiness state is similar to that seen in many sports; a basketball defender, a goalkeeper in football, a slip catcher in cricket are a few examples.
Curriculum Models in Physical Education
Games for understanding – A tactical games approach
Tutorial 7 (First tutorial for Volleyball)
Warm up
Organisation of Divided Court Game 1
- 1/3 of a badminton court with dividing line;
- Conditioned game
- Ball delivered below the knees with 2 hands;
- Ball allowed to bounce once on each side of the divided court.
Conduct rules:
- Fair play
- Keeping an accurate score
- Not allowed to move with the ball
Procedural rules:
- End line for service;
- Ball in or out;
- Method of scoring;
- Side out
Tactical solution :
With the ball
- To send the object across the line so that it is difficult to return.
Without the ball
- To cover own court area to deny space to the opposition
Volleyball is a sport which requires quick reactions and rapid, controlled movements over relatively short distances. It can be described as a ‘readiness-state’ sport. This state of readiness is required both physically and mentally.
- A sense of readiness can be portrayed by a correct body shape.
- Feet shoulder-width apart.
- Knees bent and inside the line of the toes.
- Weight forward with the knees loaded
- Spine straight
- Hands in front of the body, ready to move.
This readiness state is similar to that seen in many sports; a basketball defender, a goalkeeper in football, a slip catcher in cricket are a few examples.

Beating the Ball
Rebound sports such as volleyball require very precise positioning by the student, in order for the ball to be brought under control. Inexperienced players cannot compensate for poor positioning through superior strength or adaptation of technique. Therefore, players need to arrive at the position where they play the ball in a balanced and controlled state before the ball arrives. It is not sufficient for a player to arrive at the same time as the ball. The aim should be, when possible, to ‘beat the ball’.
Ideally, players want to time their movements so that they arrive at an interception point a fraction before the ball, in order to be able to gather themselves and prepare physically and mentally for the ball contact.
Practices for Beating the Ball
1. Chase It
Aim: To develop the ability to time movements in
relation to ball speed.
Rules: In pairs, one feeder one worker. A rolls the
ball, B chases the ball and accelerates past it
to stop it by sitting on it, facing A.
Teaching Points: Ready to go, quick off the mark, beat the ball.

Organisation of Divided Court Game 2
- Volleyball length court at a width an individual can stretch, with a net at volleyball height *;
- Conditioned game - service delivered with 1 hand
- during play the ball is delivered with 2 hands;
- Ball not allowed to bounce on either side of the divided court
- Momentum step only with the ball
Conduct rules:
- Fair play;
- Keeping an accurate score.
Procedural rules:
- Method of scoring;
- Sideout.
- Net touch by ball on service
Tactical solution:
With the ball
- To send the object across the net so that it is difficult to return.
Without the ball
- To cover own court area to deny space to the opposition .
Strategical solution:
With the ball
- Deliver the ball in a downward direction from a point higher than the net
Organisation of Divided Court Game 3
Volleyball length court at a width an individual can stretch, with a net at volleyball height
- Conditioned game - service delivered with I hand
- During play the ball is delivered with 1 or 2 hands after a self-feed;
- Ball not allowed to bounce on either side of the divided court.
- Momentum step only with the ball
Conduct rules:
- Fair play;
- Keeping an accurate score.
Procedural rules:
- Method of scoring;
- Sideout.
- Net touch by player reinforced
Tactical solution:
With the ball
- To send the object across the net so that it is difficult to return.
Without the ball
- To cover own court area to deny space to the opposition and be comfortably placed to play the object.
Strategical solution:
With the ball
- Self- feed the ball to the net and higher than the net so the ball can be delivered in a downward direction from a point higher than the net.
Without the ball
- Defend at the net or off the net
Controlling Space
Control of space by students, both as individuals and as members of a team is vital in the game of volleyball. For this reason players need to have an understanding of controlling their own space either in defence attack before they can operate effectively in a team context.
The basic principles of controlling space are:
Base Position
The best place for a player to start from in order to defend his/her court is towards the back and in the middle because:
i) it is easier to move forwards to play the ball than to move backwards, and
ii) taking a balanced middle position gives equal chance to defend to the left or to the right. The idea of a defensive base position is thus established.


Read the Attack
It is important to watch the attacker and to move to get in line with the direction he/she is facing, as this is the direction in which they are most likely to attack.
‘A’ reads the attacker
l’or’2’, and moves
in anticipation of attack.
Direction of
attacker and the attack.
Read the Attack
It is important to watch the attacker and to move to get in line with the direction he/she is facing, as this is the direction in which they are most likely to attack.
‘A’ reads the attacker
l’or’2’, and moves
in anticipation of attack.
Direction of
attacker and the attack.

Return to Base
After playing the ball the student finishes the movement cycle by going back to his/her base defensive position; therefore the cycle is as follows:
1 Base
2 Move to play the ball
3 Finish the cycle by returning to base
After playing the ball the student finishes the movement cycle by going back to his/her base defensive position; therefore the cycle is as follows:
1 Base
2 Move to play the ball
3 Finish the cycle by returning to base

Teaching Spiking
Unless the balance of the player is correctly controlled, nothing else matters; then until the posture is correctly assembled, nothing else is relevant; then until the player understands how to correctly assemble the touch point, no progression can occur; then until an understanding on how to assess ball flight has been reached, the correct positioning of the touch point cannot take place. These are fundamentals and should be tackled in that order. Once some understanding and stability has occurred in the player, the teacher can move on to:
Step One - Establish an understanding of ball flight.
Students have to respond to the peak of the ball flight by moving into position and making a physical action e.g. clapping, touching the floor with their hands etc. at the peak point. They should learn to understand to use flight to the peak to adjust positioning, flight at the peak to re-assemble balance, flight from the peak to deliver an action.
Step Two - Positioning and assembling touch point.
Reading the ball flight has to be linked to positioning the hips correctly. In the early stages, this is best done with a ball which is fed by a partner who stands facing the student who is working.
Unless the balance of the player is correctly controlled, nothing else matters; then until the posture is correctly assembled, nothing else is relevant; then until the player understands how to correctly assemble the touch point, no progression can occur; then until an understanding on how to assess ball flight has been reached, the correct positioning of the touch point cannot take place. These are fundamentals and should be tackled in that order. Once some understanding and stability has occurred in the player, the teacher can move on to:
- The technique of the approach footwork
- The rhythm between footwork and jump
- The mechanics of the arm swing
- The quality of the hand contact
Step One - Establish an understanding of ball flight.
Students have to respond to the peak of the ball flight by moving into position and making a physical action e.g. clapping, touching the floor with their hands etc. at the peak point. They should learn to understand to use flight to the peak to adjust positioning, flight at the peak to re-assemble balance, flight from the peak to deliver an action.
Step Two - Positioning and assembling touch point.
Reading the ball flight has to be linked to positioning the hips correctly. In the early stages, this is best done with a ball which is fed by a partner who stands facing the student who is working.


Once the notion of aiming with the hips has been established, the students should be encouraged to use the left side of the body to assemble the touch point.
Step Three - posture and swing
The key elements of controlling the hips and the position of the head should be introduced in a very simple form. Asking the students to spike a ball onto the floor while standing can be used. The student should start with the ball in his hand, breathe out to stabilise the position of the shoulders and the head, then swing their hand to hit the ball off the ground without tossing it, or leaning forward during or after the swing.
Dowens T (1993) Teaching Spiking – A New Perspective. Volley Coach. EVA
HPE 2204
Curriculum Models in Physical Education
Games for understanding – A tactical games approach
Tutorial 8 (Second tutorial of Volleyball)
Unless the balance of the player is correctly controlled, nothing else matters; then until the posture is correctly assembled, nothing else is relevant; then until the player understands how to correctly assemble the touch point, no progression can occur; then until an understanding on how to assess ball flight has been reached, the correct positioning of the touch point cannot take place. These are fundamentals and should be tackled in that order. Once some understanding and stability has occurred in the player, the teacher can move on to:
2.1 Teaching Progression
Step One - Establish an understanding of ball flight.
Students have to respond to the peak of the ball flight by moving into position and making a physical action e.g. clapping, touching the floor with their hands etc. at the peak point. They should learn to understand to use flight to the peak to adjust positioning, flight at the peak to re-assemble balance, flight from the peak to deliver an action.
Step Two - Positioning and assembling touch point.
Reading the ball flight has to be linked to positioning the hips correctly. In the early stages, this is best done with a ball which is fed by a partner who stands facing the student who is working.
Step Three - posture and swing
The key elements of controlling the hips and the position of the head should be introduced in a very simple form. Asking the students to spike a ball onto the floor while standing can be used. The student should start with the ball in his hand, breathe out to stabilise the position of the shoulders and the head, then swing their hand to hit the ball off the ground without tossing it, or leaning forward during or after the swing.
Dowens T (1993) Teaching Spiking – A New Perspective. Volley Coach. EVA
HPE 2204
Curriculum Models in Physical Education
Games for understanding – A tactical games approach
Tutorial 8 (Second tutorial of Volleyball)
- Introduction
- Develop Spike
- 1v1 Fixtures, Assessment/grading, Records
- Develop Spiking
- 2v2 Review Procedural Rules & Conduct Rules
- Teaching Spiking - Revision
Unless the balance of the player is correctly controlled, nothing else matters; then until the posture is correctly assembled, nothing else is relevant; then until the player understands how to correctly assemble the touch point, no progression can occur; then until an understanding on how to assess ball flight has been reached, the correct positioning of the touch point cannot take place. These are fundamentals and should be tackled in that order. Once some understanding and stability has occurred in the player, the teacher can move on to:
- The technique of the approach footwork
- The rhythm between footwork and jump
- The mechanics of the arm swing
- The quality of the hand contact
2.1 Teaching Progression
Step One - Establish an understanding of ball flight.
Students have to respond to the peak of the ball flight by moving into position and making a physical action e.g. clapping, touching the floor with their hands etc. at the peak point. They should learn to understand to use flight to the peak to adjust positioning, flight at the peak to re-assemble balance, flight from the peak to deliver an action.
Step Two - Positioning and assembling touch point.
Reading the ball flight has to be linked to positioning the hips correctly. In the early stages, this is best done with a ball which is fed by a partner who stands facing the student who is working.

Once the notion of aiming with the hips has been established, the students should be encouraged to use the left side of the body to assemble the touch point.
Step Three - posture and swing
The key elements of controlling the hips and the position of the head should be introduced in a very simple form. Asking the students to spike a ball onto the floor while standing can be used. The student should start with the ball in his hand, breathe out to stabilise the position of the shoulders and the head, then swing their hand to hit the ball off the ground without tossing it, or leaning forward during or after the swing.
3. Warm up
3.1 Teaching Spike
Step Four – Link the touch point to the swing
In the same partner feed situation as in Step Two, the ball should be tossed to make the working student move from side to side, assemble the touch, then merely stop the ball with the left hand at the touch point. At either a pre-arranged signal (partner says now) or on a time count (every third toss) the working student should not only assemble the touch point but continue to actually swing to hit the ball to the floor with the hitting hand.
4. 1v1 Fixtures, Assessment/Grading, Records
Organisation of Divided Court Game 3
Conduct rules:
Procedural rules:
Tactical solution:
With the ball
Without the ball
Strategical solution:
With the ball
Without the ball
4. Teaching Spiking
Step 5 - Posture for Spiking
The crucial element of posture for spiking is control of the space between the hips and the shoulders. There must also be a second control space between the shoulders and the touch (contact point)
Positioning – There are 2 crucial elements to be considered when teaching positioning.
Step Three - posture and swing
The key elements of controlling the hips and the position of the head should be introduced in a very simple form. Asking the students to spike a ball onto the floor while standing can be used. The student should start with the ball in his hand, breathe out to stabilise the position of the shoulders and the head, then swing their hand to hit the ball off the ground without tossing it, or leaning forward during or after the swing.
3. Warm up
3.1 Teaching Spike
Step Four – Link the touch point to the swing
In the same partner feed situation as in Step Two, the ball should be tossed to make the working student move from side to side, assemble the touch, then merely stop the ball with the left hand at the touch point. At either a pre-arranged signal (partner says now) or on a time count (every third toss) the working student should not only assemble the touch point but continue to actually swing to hit the ball to the floor with the hitting hand.
4. 1v1 Fixtures, Assessment/Grading, Records
Organisation of Divided Court Game 3
- Volleyball length court at a width an individual can stretch, with a net at volleyball height *;
- Conditioned game - service delivered with I hand
- During play the ball is delivered with 1 or 2 hands after a self-feed;
- Ball not allowed to bounce on either side of the divided court.
- Momentum step only with the ball
Conduct rules:
- Fair play;
- Keeeping an accurate score.
Procedural rules:
- Method of scoring;
- Sideout.
- Net touch by player reinforced
Tactical solution:
With the ball
- To send the object across the net so that it is difficult to return.
Without the ball
- To cover own court area to deny space to the opposition and be comfortably placed to play the object.
Strategical solution:
With the ball
- Self- feed the ball to the net and higher than the net so the ball can be delivered in a downward direction from a point higher than the net.
Without the ball
- Defend at the net or off the net
4. Teaching Spiking
Step 5 - Posture for Spiking
The crucial element of posture for spiking is control of the space between the hips and the shoulders. There must also be a second control space between the shoulders and the touch (contact point)
Positioning – There are 2 crucial elements to be considered when teaching positioning.
- The positioning of the hips in relation to the fight of the ball
- The positioning of the final touch point in relationship to the body.

Step Six - Last two steps
Students move about the court tossing the ball into the air for themselves to jump and catch. Jump must be preceded with the last two steps ‘right foot, left foot’ for a right hand hitting action. The steps should be taken sharply. The students can be encouraged to breathe out as they take the last two steps and the control space for the hips should be highlighted as they catch.
Teach students to try and catch at the highest point
Step Seven - Last two steps to touch point
Still working in the situation where the student tossing the ball stands in front of the student working, the working student has to read the ball flight, move to position aiming with the hips, use last two steps to accelerate to the take off point, then jump and assemble touch point. As in Step Four, the progression from touching the ball with the left hand to actually swinging at it, should be introduced slowly and in a very controlled fashion.
Once some success is being achieved, the pairs can become threes and the feeding point moved to the side of the working student. During these progressions, when the ball is being hit, it should be directed to the floor or straight to the feeder or to the third student who is acting as target.
The notion of introducing a target direction for the hit should be linked to the use of the hips to aim the touch point.
Step Eight - Hitting over a net
When the previously outlined steps have been tackled, the net should be introduced. The feed can be from the other side of the net to the working student, or from the side of the student as in normal spiking.
General
The progression should be worked through in the steps outlined but at any stage the teacher can return to a previous step and revise a particular point. The steps should also be interspersed with regular throwing practice with the American football. In general, the process of teaching these fundamentals will take a considerable amount of time and the teacher should not expect immediate results. If any of the stages or any of the fundamentals are not properly addressed, - then the level of the expertise which the student could potentially reach will be severely limited. Spiking is the most dynamic aspect of volleyball. It is also technically the most difficult to learn and therefore needs the most time spent in introducing and teaching
Dowens T (1993) Teaching Spiking – A New Perspective. Volley Coach. EVA
5. 2v2 Review Conduct & Procedural Rules Strategical/Tactical Solutions
Organisation of Divided Court Game 4
- Volleyball length court at a width two individuals scan stretch, with a net at volleyball height *;
- Conditioned game - service delivered with I hand
- During play the ball is delivered with 1 or 2 hands after a self feed;
- Ball not allowed to bounce on either side of the divided court
- Momentum step only with the ball
Conduct rules:
- Fair play;
- Keeping an accurate score.
Procedural rules:
- Method of scoring;
- Net touch by player reinforced
- Catch the ball and then self feed - max 1 touch
- Introduce rotation
Tactical solution:
With the ball
- To send the object across the net so that it is difficult to return.
- Placement
- Pace
- Disguise
Without the ball
- To cooperatively cover the court area to deny space to the opposition and be comfortably placed to play the object.
Strategical solution:
Without the ball
- Defend off the net
- Communication – mine/in or out
With the ball
- Self- feed the ball to the net and higher than the net so the ball can be delivered in a downward direction from a point higher than the net.
- Creating and controlling space for the spike to be effec
Organisation of Divided Court Game 5
- Volleyball length court at a width two individual scan stretch, with a net at volleyball height *
- Conditioned game - service delivered with I hand
- During play the ball is delivered with 1 or 2 hands after a partner feed;
- Ball not allowed to bounce on either side of the divided court
- Momentum step only with the ball
Conduct rules:
- Fair play;
- Keeping an accurate score.
Procedural rules:
- Method of scoring;
- Net touch by player reinforced
- Max 2 touches
- Rotation
Tactical solution:
With the ball
- Establish a position on court that enables you to see the ball and the oppositions court
- To send the object across the net so that it is difficult to return.
- Placement
- Pace
- Disguise
- To cooperatively cover the court area to deny space to the opposition and be comfortably placed to play the object.
Without the ball
- Defend off the net
- Communication – mine/in or out
- Creating and controlling space for the spike to be effective
With the ball
- Partner- feed the ball to the net and higher than the net so the ball can be delivered in a downward direction from a point higher than the net.
HPE 2204
Curriculum Models in Physical Education
Games for understanding – A tactical games approach
Tutorial 9 (Third tutorial of Volleyball)
1. Introduction Warm-up with partner
2. Organisation of Divided Court Game 5 (from Week 8) – Continue with 2v2 fixtures
- Volleyball length court at a width two individual scan stretch, with a net at volleyball height *;
- Conditioned game - service delivered with I hand
- During play the ball is delivered with 1 or 2 hands after a partner feed;
- Ball not allowed to bounce on either side of the divided court.
3. The Overhand Pass (Volley)
The overhand pass is a two-handed pass played above the forehead. With its high and slow trajectory, it gives beginners the best chance to read the flight of the ball and to move to the contact point, thus making it the ideal starting point for teaching the game. Using only the volley it is possible to get a 1 v 1 game going very quickly. Once mastered, the volley is the most accurate method of passing the ball.
Types of Overhand Pass
- The overhand pass is most commonly used to set up an attack. It is used to put the ball high and close to the net (one metre) so that an attacker can jump and smash it.
- It is also used when receiving a slow-moving ball from the opposition, to control the ball and pass it to a team mate. (Freeball)
- All players need to be able to volley the ball over both short and long distances (2m to 5m).

Fig 3 (a,b,c,d)
Technique Description
Technique Description
- Be ready to move to the ball (refer to Ready for Action, tutorial notes 6) (See Fig. 3a)
- Watch the bail and anticipate where it is going (peak point of the bait)
- Move quickly to the interception point (midline of the body, ball above hairline) maintaining good body shape; be behind and under the ball
- Be balanced and facing the direction in which he/she wants to play the ball before the ball arrives (refer to Beating the Ball, tutorial notes) (See Fig. 3b)
- Have his/her body under the ball, with the knees bent and arms relaxed. (See Fig. 3c)
- Contact the ball above the hairline, on the midline of the body
- Use a 1-2 rhythm to play the ball; i.e. count one — down beat with the knees bending farther as the hands go up to contact point, count two — extend from the knees through the ball in direction of the target (using the whole body, not only the arms and hands) (See Fig. 3c/d)
- Finish the action physically by extending to the target, and mentally by seeing in the mind’s eye the correct execution
- Recover and be ready for the next action; e.g. if the player has played the ball to the setter, he/she should prepare to cover the attacker, or should return quickly to the defensive base position if the ball has been played over the net
- The hands are open, in the shape of the ball.
- The index fingers and thumbs form a triangle; index fingers and thumbs are the same distance apart.
- The thumbs should point at the opposite ear.
- The forearms make a second, bigger triangle.
- The ball is contacted with the pads of the thumbs along the length of the forefinger and the pads of all the other fingers.
- The player should try to play the ball quietly with relaxed arms, wrists and fingers. (See Figs. 4.1 & 4.2)

4. Practices for Overhand Pass
Catch or Bounce
Aim: To ensure player moves to, and establishes, correct contact position.
Rules: A feeds underarm to B, who moves to get inside the trajectory of the ball, claps as it peaks, and then:
‘1’ = B lets ball bounce
‘2’ = B catches ball.
Teaching Points: Catch the ball above and in front of the forehead on the midline of the body.
Catch or Bounce
Aim: To ensure player moves to, and establishes, correct contact position.
Rules: A feeds underarm to B, who moves to get inside the trajectory of the ball, claps as it peaks, and then:
- Lets it bounce close to the body (See Fig.5)
- Catches the ball in the volley position.
‘1’ = B lets ball bounce
‘2’ = B catches ball.
Teaching Points: Catch the ball above and in front of the forehead on the midline of the body.

Volley to Self
Aim: To teach players to move under the ball and to volley it using knee extension.
Rules: Toss ball to self, let it bounce; move under it and volley to self. (See Fig. 6)
Teaching Points: Move under the ball. Use knee extension to play the ball.
Aim: To teach players to move under the ball and to volley it using knee extension.
Rules: Toss ball to self, let it bounce; move under it and volley to self. (See Fig. 6)
Teaching Points: Move under the ball. Use knee extension to play the ball.

Rhythm Pass
Aim: To teach rhythm of volley pass.
Rules: Volley to self — two metres high.
Teaching Points: Establish the rhythm 1 —2. Count the rhythm aloud.
Through the Angle
Aim: To teach volley through angles.
Rules: A feeds to B who plays an overhand pass to C. B moves to receive feed from C and plays an overhand pass to A. (See Fig. 7)
Teaching Points: B must create space by establishing position early behind the flight of the incoming ball, and must move forward through the contact point towards the target.

5. Ball Flight
a) Ball Flight Judgement
The ability of a student to predict the path of the ball, both in terms of space (where) and time (when) is critical to success in volleyball. This prediction must also be accompanied by a movement of the player to the point of interception, and by his or her preparation to play the ball.
It is therefore essential that students are taught the fundamental skills of judging ball flight and that some time is allocated to learning these skills.
In volleyball, three types of trajectory can be defined.
Type One
e.g. the overhand pass. Characterised by low speed and easily identifiable peak point. This trajectory is easiest to judge.


When introducing the game:
Student A and B play the ball back and forth. C and D try to hit the ball with their ball.
All 4 students have a ball – they attempt a mid air collision.
Student A and B play the ball back and forth. C and D try to hit the ball with their ball.
All 4 students have a ball – they attempt a mid air collision.
- Teach good feeding skills to ensure the use of this type of trajectory.
- Use a high net
- Do not allow players to serve the ball overarm. (Start the rally with a volley or underarm throw over the net.)

Type Two
e.g. overarm serve. Characterised by high speed and flat trajectory. This is considered moderately difficult to judge and should not be used with beginners.
e.g. overarm serve. Characterised by high speed and flat trajectory. This is considered moderately difficult to judge and should not be used with beginners.

Type Three
e.g. smash. Characterised by very high speed and downward trajectory. This is considered very difficult - to judge and controlling this type of shot is an advanced skill.
e.g. smash. Characterised by very high speed and downward trajectory. This is considered very difficult - to judge and controlling this type of shot is an advanced skill.
b) Practice for Ball Flight Judgement (Type One Trajectories)
Peak Point
Aim: To teach reading of ball flight.
Rules: Each player with one ball (any type). Toss the ball in the air, clap at the peak point of the ball. (By clapping at the moment the ball peaks, the player acknowledges the mid-point of the ball flight, which helps in judging the point of interception.) Catch the ball.
Progression: Toss the ball in the air, clap at peak, allow the ball to bounce or no bounce allowed.
Move to catch it:
c) Advanced Practice (Type Two Trajectories)
Track the Ball
Aim: To develop the players’ ability to judge ball flight and to coordinate movement.
Rules: Working in pairs, feeder and worker on opposite side of the net Feeder throws overarm or serves overarm to a partner on the other side of the net.
The partner moves to:
Peak Point
Aim: To teach reading of ball flight.
Rules: Each player with one ball (any type). Toss the ball in the air, clap at the peak point of the ball. (By clapping at the moment the ball peaks, the player acknowledges the mid-point of the ball flight, which helps in judging the point of interception.) Catch the ball.
Progression: Toss the ball in the air, clap at peak, allow the ball to bounce or no bounce allowed.
Move to catch it:
- sitting down
- after turning 180° 360°
- behind back
- as close to the ground as possible
- lying down with feet
- above forehead
- with a jump.
c) Advanced Practice (Type Two Trajectories)
Track the Ball
Aim: To develop the players’ ability to judge ball flight and to coordinate movement.
Rules: Working in pairs, feeder and worker on opposite side of the net Feeder throws overarm or serves overarm to a partner on the other side of the net.
The partner moves to:
- Let the ball bounce between the feet
- Let the ball go through the arms like a basket
- Catch the ball between the knees
- Turn 180° to let the ball bounce off the coccyx.
- Turn 180° to let the ball bounce through the legs.

6. Organisation of Divided Court Game 6 (Introduction)
As for Game 5 – introduce overhand pass
Fig 1 Base position and service reception
Co-operative Feed
Fig 2 Use 3 touches to attack
As for Game 5 – introduce overhand pass
Fig 1 Base position and service reception
Co-operative Feed
Fig 2 Use 3 touches to attack
7. Organisation of Divided Court Game 6
- Volleyball length court at a width two individual scan stretch, with a net at volleyball height *;
- Conditioned game - Cooperative service
- Overhand pass to partner at the net
- Partner overhand passes the ball parallel to the net
- Ball is delivered over the net with 1 or 2 hands after a partner feed;
- Ball not allowed to bounce on either side of the divided court.


HPE 2204
Curriculum Models in Physical Education
Games for understanding – A tactical games approach
Tutorial 10
a) Ball Flight Judgement
The ability of a student to predict the path of the ball, both in terms of space (where) and time (when) is critical to success in volleyball. This prediction must also be accompanied by a movement of the player to the point of interception, and by his or her preparation to play the ball.
It is therefore essential that students are taught the fundamental skills of judging ball flight and that some time is allocated to learning these skills.
In volleyball, three types of trajectory can be defined.
Type One
e.g. the overhand pass. Characterised by low speed and easily identifiable peak point. This trajectory is easiest to judge.
Conduct rules:
Procedural rules:
Tactical solution:
With the ball
Strategical solution:
Without the ball
With the ball
Curriculum Models in Physical Education
Games for understanding – A tactical games approach
Tutorial 10
- Warm-up
a) Ball Flight Judgement
The ability of a student to predict the path of the ball, both in terms of space (where) and time (when) is critical to success in volleyball. This prediction must also be accompanied by a movement of the player to the point of interception, and by his or her preparation to play the ball.
It is therefore essential that students are taught the fundamental skills of judging ball flight and that some time is allocated to learning these skills.
In volleyball, three types of trajectory can be defined.
Type One
e.g. the overhand pass. Characterised by low speed and easily identifiable peak point. This trajectory is easiest to judge.
Conduct rules:
- Fair play;
- Keeping an accurate score.
Procedural rules:
- Method of scoring;
- Net touch by player reinforced
- Max 3 touches (Min 2 touches in a competitive game
- Rotation
Tactical solution:
With the ball
- To send the object across the net so that it is difficult to return.
- Placement
- Power
- Disguise
- To cooperatively cover the court area to deny space to the opposition and be comfortably placed to play the object.
Strategical solution:
Without the ball
- Service Receive
- Communication – mine/in or out
- Defend at the net or off the net
With the ball
- Partner- feed the ball to the net and higher than the net so the ball can be delivered in a downward direction from a point higher than the net. Consider the strength & weaknesses of the hitter
- Creating and controlling space for the spike to be effectiv
- e.g. the overhand pass. Characterised by low speed and easily identifiable peak point.
- This trajectory is easiest to judge.

When introducing the game:
Student A and B play the ball back and forth. C and D try to hit the ball with their ball.
All 4 students have a ball – they attempt a mid-fight collision.
Type Two
e.g. overarm serve. Characterised by high speed and flat trajectory. This is considered moderately difficult to judge and should not be used with beginners.
Type Three
e.g. smash. Characterised by very high speed and downward trajectory. This is considered very difficult - to judge and controlling this type of shot is an advanced skill.
b) Practice for Ball Flight Judgement (Type One Trajectories)
Peak Point
Aim: To teach reading of ball flight.
Rules: Each player with one ball (any type). Toss the ball in the air, clap at the peak point of the ball (By clapping at the moment the ball peaks, the player acknowledges the mid-point of the ball flight, which helps in judging the point of interception.) Catch the ball.
Progression: Toss the ball in the air, clap at peak, allow the ball to bounce or no bounce allowed.
Move to catch it:
c) Advanced Practice (Type Two Trajectories)
Track the Ball
Aim: To develop the players’ ability to judge ball flight and to coordinate movement.
Rules: Working in pairs, feeder and worker on opposite side of the net Feeder throws overarm or serves overarm to a partner on the other side of the net.
The partner moves to:
Conduct rules:
Procedural rules:
Tactical solution:
With the ball
Without the ball
With the ball
3. Blocking
The block is the first line of defense against the smash. It may be performed by one, two or three front-row players who jump at the net to stop the smashed ball from crossing the net and to deflect it back into the opposition’s court. The block can also stop the smasher from hitting a particular area of the court, thus channeling the ball to where the back court defenders have been placed.
Blocking is a difficult skill to master, but time spent practising it will be well rewarded. Good blocking not only wins points, it can also demoralise the other team and pave the way for victory.
Types of Block
Being a good blocker depends on many factors other than jumping high. Much more important is knowing why, when and where. Read the smasher and control the hands while blocking.
Technique Description — Block
The student should:
Student A and B play the ball back and forth. C and D try to hit the ball with their ball.
All 4 students have a ball – they attempt a mid-fight collision.
- Teach good feeding skills to ensure the use of this type of trajectory.
- Use a high net
- Do not allow players to serve the ball overarm. (Start the rally with a volley or underarm throw over the net.)
Type Two
e.g. overarm serve. Characterised by high speed and flat trajectory. This is considered moderately difficult to judge and should not be used with beginners.
Type Three
e.g. smash. Characterised by very high speed and downward trajectory. This is considered very difficult - to judge and controlling this type of shot is an advanced skill.
b) Practice for Ball Flight Judgement (Type One Trajectories)
Peak Point
Aim: To teach reading of ball flight.
Rules: Each player with one ball (any type). Toss the ball in the air, clap at the peak point of the ball (By clapping at the moment the ball peaks, the player acknowledges the mid-point of the ball flight, which helps in judging the point of interception.) Catch the ball.
Progression: Toss the ball in the air, clap at peak, allow the ball to bounce or no bounce allowed.
Move to catch it:
- Sitting down
- Af turning 180° 360°
- Behind back
- As close to the ground as possible
- Lying down with feet
- Above forehead
- With a jump.
c) Advanced Practice (Type Two Trajectories)
Track the Ball
Aim: To develop the players’ ability to judge ball flight and to coordinate movement.
Rules: Working in pairs, feeder and worker on opposite side of the net Feeder throws overarm or serves overarm to a partner on the other side of the net.
The partner moves to:
- Let the ball bounce between the feet.
- Let the ball go through the arms like a basket.
- Catch the ball between the knees.
- Turn 180° to let the ball bounce off the coccyx.
- Turn 180° to let the ball bounce through the legs.
- SEPEP 2v2 Scrimmage Games - Divided Court Game 5
Conduct rules:
- Fair play;
- Keeping an accurate score.
Procedural rules:
- Volleyball length court at a width two individual scan stretch, with a net at volleyball height *;
- Conditioned game - service delivered with I hand
- Primary rule change – catch first ball, fight 1 to partner, over hand pass, attack with 1 or 2 hands
- 3 touches
- Method of scoring;
- Net touch by player reinforced
- Max 3 touches
- Rotation
Tactical solution:
With the ball
- to send the object across the net so that it is difficult to return.
- Placement
- Power
- Disguise
- To cooperatively cover the court area to deny space to the opposition and be comfortably placed to play the object.
Without the ball
- Service Receive
- Communication – mine/in or out
- Defend off the net
With the ball
- Partner- feed the ball to the net and higher than the net so the ball can be delivered in a downward direction from a point higher than the net. Consider the strength & weaknesses of the hitter
- Creating and controlling space for the spike to be effective
3. Blocking
The block is the first line of defense against the smash. It may be performed by one, two or three front-row players who jump at the net to stop the smashed ball from crossing the net and to deflect it back into the opposition’s court. The block can also stop the smasher from hitting a particular area of the court, thus channeling the ball to where the back court defenders have been placed.
Blocking is a difficult skill to master, but time spent practising it will be well rewarded. Good blocking not only wins points, it can also demoralise the other team and pave the way for victory.
Types of Block
- A block can be performed by one player alone or in combination with one or both of the other front court
- A two-person block is most common in volleyball, as it is the best compromise between strong blocking and
Being a good blocker depends on many factors other than jumping high. Much more important is knowing why, when and where. Read the smasher and control the hands while blocking.
Technique Description — Block
The student should:
- Stand about half a metre from the net in Volleyball position
- Hands in front of the shoulders elbows forward (ears on)
- Be balanced and ready to move to either side depending on where the ball is set.
- Watch the opposition develop their attack and move quickly to where it is anticipated the attacker will hit the ball over the net.
- Use side steps or cross steps to move along the net, and use a brake step to stop lateral movement before jumping.

|

|

Practices for the Block
Wall Block - Ensure that there are no obstructions on the wall.
Aim: To teach control in the air and the use of the hands when blocking.
Rules: Students block against a wall, above a chalk line. The whole hand should be placed on the wall. Don’t touch the wall (except with the hands).
KTP: Students jump using vigorous knee extension and controlled arm movement.
Land on the same spot.

Shadow Block
Aim: To teach movement along the net.
Rules: A faces partner B across the net. A uses side step to move left or right. B follows. Students
block jump to touch hands palm to palm above
KTP: B must be ready to move (knees bent) and quickly follow A’s movement.
Control of jumping and landing (no net touches) is more important than speed of movement or height
of jump at this stage.
Fronting the Attacking
Aim: To teach block timing and fronting the
Rules: A smash approaches, jumps and throws the ball over the net. B block-jumps to prevent the
ball from crossing the net.
KTP: B must synchronize his/her jump with the attack.
Progression: A varies direction of approach. B must move to front the hitter.
KTP: As A varies the direction of approach, B must observe A and move quickly, using side steps, to get in front of where the ball will cross the net.
Smash and Block
Smash and block drills should be practised only if both skills can be performed with control. If this is not the case, there is a risk of the smasher and blocker colliding.
4. Cooperation 3 v 3
Court Size: From 8m x 4m up to 12m x 6m, depending on ability of students and court marking available. (Inside lines of a badminton court are satisfactory.)
Net Height: Men’s height will give the students time and encourage longer rallies.
Ball: Soft Touch
Contacts: All overhand passes
Tactics
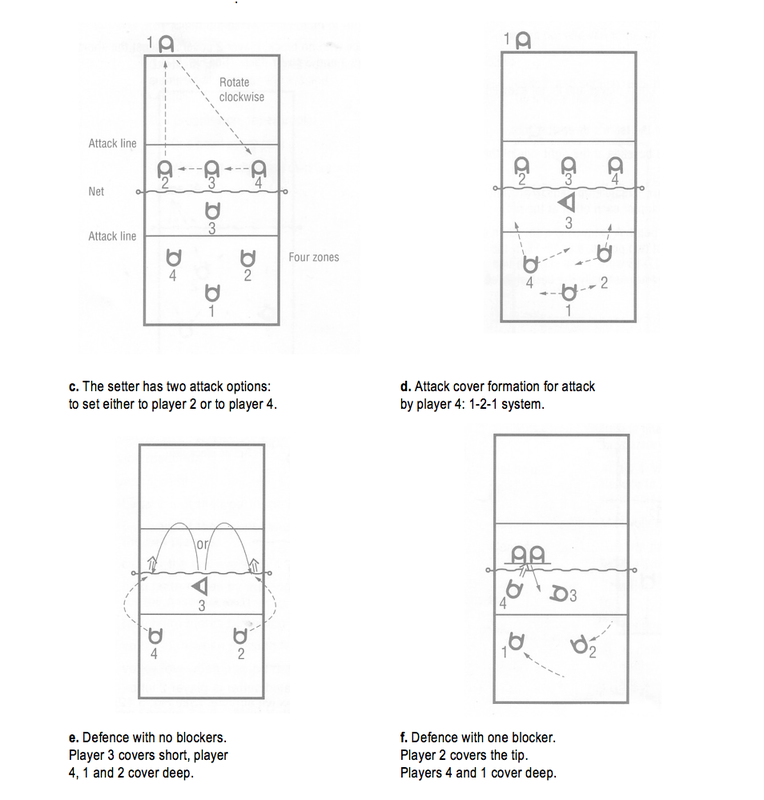
a. There are three court zones. Students rotate clockwise b. Service reception formation: designated setter is student 2 who stands at the net; students 1 and 3 win the right to serve receive service.


Official Rules 3 v 3
Court Size:From 8m x 4m up to 12m x 6m, depending on ability of students and court marking available. (Inside lines of a badminton court are satisfactory.)
Net Height:Men’s height will give the students time and encourage longer rallies.
Ball: Soft Touch
Contacts:Underarm serve, underhand pass, smash & block are introduced
Minimum two contacts, maximum three.
1. The server is designated as a back court student and is not allowed to block or smash.
2. The block does not count as one of the team’s three contacts.
3. Server must serve from behind the baseline.
4. Net contact and centre line faults are strictly enforced (to prevent blockers and smashers landing on top of each other at the net).
5. Rally point. A team wins a set when it reaches 25 points with a minimum lead of two points, e.g. 24-24 play continues until a two point lead is achieved 27-25. The match is won by the team that wins three sets.
Tactics
d. Defence with no block. e. Defence with one blocker. Use only against a strong smasher.
Student 2 covers against the short attack; Student 2 moves from outside the line of the block and prepared
students 1 and 3 cover deep to cover against a tip attack.

5. Preparation for Week 11
Game Format 4 v 4— Supermini-volley
Condition for Game Play
Court size: 1 4m x 7m (outside lines of a badminton court).
Net height: 2.10 metres.
Ball: Volleyball.
Contacts: As per official rules
Scoring: As per official rules
Official Rules Introduced
There is an attack line two metres from the net. The back court player 1 cannot smash the ball from in front of the attack line.
Tactics


HPE 2204
Curriculum Models in Physical Education
Games for understanding – A tactical games approach
Tutorial 11
Types of Forearm Pass
The forearm pass is a general term which is used to describe several similar but slightly differing techniques.
Technique Description
The student should:
• be alert and ready to move to the ball. (a)
• watch the student playing the ball, watch the ball and anticipate where it is going
• move quickly to the interception point (midline of body, ball well in front of body and between the waist and knees), maintain good posture and create space in which to contact the ball well in front of the body. (b)
• before the ball arrives be in a balanced position, feet slightly more than shoulder width apart, knees bent and shoulders relaxed.
• the hips should be back and the arms and hands extended in front of the body.
• the ball is contacted on the midline of the body between the knees and the waist; the ball is played on the forearms. (c)
The speed of the incoming ball determines how it is played:
• If it is slow, the student has to give it some speed in order for it to reach the target. This is achieved by extending from the knees and playing the ball with the whole body weight in the direction of the target. The student should not swing the arms at the ball. (For an example of a free ball pass see diagram below.)
• If it is medium-paced, the student should act as a wall and allow the ball to bounce off the forearms; this is used frequently during service reception.
• If it is very fast, the student should absorb some of the speed of the ball by moving the whole body backwards as the ball contacts the forearms. (This is the defensive dig, an advanced skill requiring perfect timing but it should be needed only when the opponents are serving or smashing the ball very fast.)
Curriculum Models in Physical Education
Games for understanding – A tactical games approach
Tutorial 11
- Warm Up (continuation of 3v3 from last week)
- 1 The Underhand or Forearm Pass
Types of Forearm Pass
The forearm pass is a general term which is used to describe several similar but slightly differing techniques.
- The ‘service reception’ or ‘first’ pass technique is used to receive a service. (Higher posture, more time to see and react to the ball.)
- The ‘defensive pass’ is used to prevent a hard or a placed smash from hitting the floor. (Lower posture, very little time to see and react to the ball.)
- The ‘free ball pass’ is used to control a relatively easy, high ball from the opponents and to pass it to the setter. (More upright posture, no time pressure.)
Technique Description
The student should:
• be alert and ready to move to the ball. (a)
• watch the student playing the ball, watch the ball and anticipate where it is going
• move quickly to the interception point (midline of body, ball well in front of body and between the waist and knees), maintain good posture and create space in which to contact the ball well in front of the body. (b)
• before the ball arrives be in a balanced position, feet slightly more than shoulder width apart, knees bent and shoulders relaxed.
• the hips should be back and the arms and hands extended in front of the body.
• the ball is contacted on the midline of the body between the knees and the waist; the ball is played on the forearms. (c)
The speed of the incoming ball determines how it is played:
• If it is slow, the student has to give it some speed in order for it to reach the target. This is achieved by extending from the knees and playing the ball with the whole body weight in the direction of the target. The student should not swing the arms at the ball. (For an example of a free ball pass see diagram below.)
• If it is medium-paced, the student should act as a wall and allow the ball to bounce off the forearms; this is used frequently during service reception.
• If it is very fast, the student should absorb some of the speed of the ball by moving the whole body backwards as the ball contacts the forearms. (This is the defensive dig, an advanced skill requiring perfect timing but it should be needed only when the opponents are serving or smashing the ball very fast.)


The student should recover from the shot and be thinking about what will happen next, and how he/she should respond to the changing situation.
Ball Contact
• The ball is played on the fleshy inside edges of the forearms just above the wrists. The elbows should be straight and must not bend during the passing action.
• The students should imagine that the ball is a bubble which they do not want to burst. Telling them to touch the “bubble” gently rather than hitting it can help students to gain a correct feel for what good contact in the forearm pass is like.
• To form a flat platform, bring the edges of the hands together, palms up; rest the fingers of the left hand on the fingers of the right hand and close the hands up until the thumbs are touching and parallel.
(Fatty Forearms)

• The angle of the hips and the arms is the key to getting sufficient height with the forearm pass.
• To play the ball high, get the hips under the ball.

REMEMBER
The key task for the student is to read the ball flight and to move to establish a correct body posture and contact point prior to playing the ball.
“Touching” the ball rather than “hitting” it helps to promote good control
Practices for Forearm or Underhand Pass
2.2 Bump Ball
Aim: To familiarise students with ball/arm contact.
Rules: Student A tosses the ball in the air, lets it bounce and moves under the ball to pass to self, lets it bounce, pass to self.
KTP’s: Establish control of the ball before insisting on height of pass. Ensure students take the ball well in front of the body and use knee extension, not arm swing, to pass the ball.

2.3 Bump To Partner
Aim: To teach contact point in front of the body.
Rules: A feeds slightly in front of B, who moves forward to bump the ball back to A.
KTP’s: Use words to create a soft contact with the ball: “Touch the ball gently”; “The ball is like a bubble”.
Aim: To teach contact point in front of the body.
Rules: A feeds slightly in front of B, who moves forward to bump the ball back to A.
KTP’s: Use words to create a soft contact with the ball: “Touch the ball gently”; “The ball is like a bubble”.

2.4 Bump Through the Angle
Aim: To develop the skill of passing the ball through an angle.
Rules: A feeds over the net to B, who passes the ball to target student C. C catches the ball and returns it to A to feed again.
KTP’s: B must use body weight towards the target to control the direction of the pass.
Aim: To develop the skill of passing the ball through an angle.
Rules: A feeds over the net to B, who passes the ball to target student C. C catches the ball and returns it to A to feed again.
KTP’s: B must use body weight towards the target to control the direction of the pass.

2.5 Bump and Cover
Aim: To teach movement and linking to the next
Rules: As above but C overhand passes ball to self and then to a new position for B. B bumps again to C.
KTP’s: B must stay in posture and adjust quickly to the new position. B learns to link to the next action and to control the length of the forearm pass action.
3. Selection 4 v 4
Game Format 4 v 4— Supermini-volley
Condition for Game Play
Court size: 1 4m x 7m (outside lines of a badminton court).
Net height: 2.10 metres.
Ball: Volleyball.
Contacts: As per official rules
Scoring: As per official rules
Official Rules Introduced
There is an attack line two metres from the net. The back court player 1 cannot smash the ball from in front of the attack line.
Tactics
a. There are four court zones. b. Service reception formation;
Player 1 is a back court player. designated setter is player 3.
Players 2, 3 and 4 are front players Players 4, 1 and 2 are ready to receive the serve.